Pages

Sunday, October 31, 2010

Hoops - part 5


Matt is holding a water level while John pounds a post into the ground. The posts were cut from 1 1/4 inch EMT electrical conduit.


The 1 1/4 inch anchor posts are lined, leveled and squared.


Lizzi measures and marks the cyclone fence top rails before bending. The bender was made for making a 12 foot arch but by adding an additional 10' 6" length of tubing and starting the arch 5 foot up, it created a 16 foot wide hoop house that is 11 feet high. It appears higher because the back fill around the anchor tubes has not been done.


The hoops are slid into the ground anchor pipes. In order to hold the hoops in place, self-tapping screws were drilled into the pipes where they connected.


The hoops are up by Saturday evening, October 30, 2010. A 2 x 6 board was bolted at the junction of the ground anchor and the hoop on one side of the structure; the other side will get the same baseboard. This is where the plastic cover will be attached to later on. The board will be where the ground level will be back-filled to.

A lot of work accomplished thanks to many volunteers on Saturday. Matt, John, Lizzi, Luke, Toph, Jackie, Annie, Sandy, and I... don't think I left anyone out?

The green house is 32 feet long, 16 feet wide and will be about 11 feet high. Much work left to do and don't know if we'll finish before winter sets in.

Saturday, October 23, 2010

Rainy Day halts construction - part 4


It's raining in Wisconsin today, so I left outside construction work on the greenhouse on hold for today and maybe for the weekend? I feel kind of like the Jack-o-lantern above, the one in the middle!

The photo on the right is where I was able to back-fill to yesterday while the ground was still dry. I'm to the point that I need to start laying out the greenhouse base and then back-fill to it, I bought the stuff I intend to use for that yesterday.

I made another trip to Menard's yesterday morning and bought 2 x 6 studs to frame the base of the greenhouse, more pink polystyrene insulation and some 1 1/4 inch conduit to pound in the ground to anchor the base and to insert the 1 3/8 inch top-rails that will form the hoops.

I spent another $200+ dollars and I'm sure I'm running way over budget by now, but I'll assess the damage when it's finished. I have cut corners to save in other areas when possible. One area is in the back-fill.

Back Fill

I'm not sure if I've explained this already, but I'm using the same dirt/clay that I excavated as my back fill. I know that some of the plans I've consulted call for #18 stone to be the back-fill around the slotted drain tile. The problem that I have with that is money. It would have cost $700 - $800 dollars to have a load of rock trucked in and I'm not sure if that would have been enough, too much, or just right, I just didn't feel I should spend that amount for rock when some sites are reporting using mud as back-fill and then drying the mud out and observing no difference in heat storage.

What I decided to do instead is to increase the length of buried pipe by 200 feet (about 40% more than I originally estimated I needed) since the pipe is only $32 per 100 feet and then just back-fill with the dirt I excavated.

I don't know if my estimates are correct anymore because I've changed the projected greenhouse size. It doesn't really matter, because I don't think this is a proven science anyway so it's all just trial and error and I'll probably make lots of errors! However, I might try to run my numbers on Sunny John's Subterranean calculator tonight when I get back from work to see if I'm actually close to what they suggest for greenhouse size and the subterranean heating/cooling network.

Wednesday, October 20, 2010

Preparing to Back-fill, more components - part 3


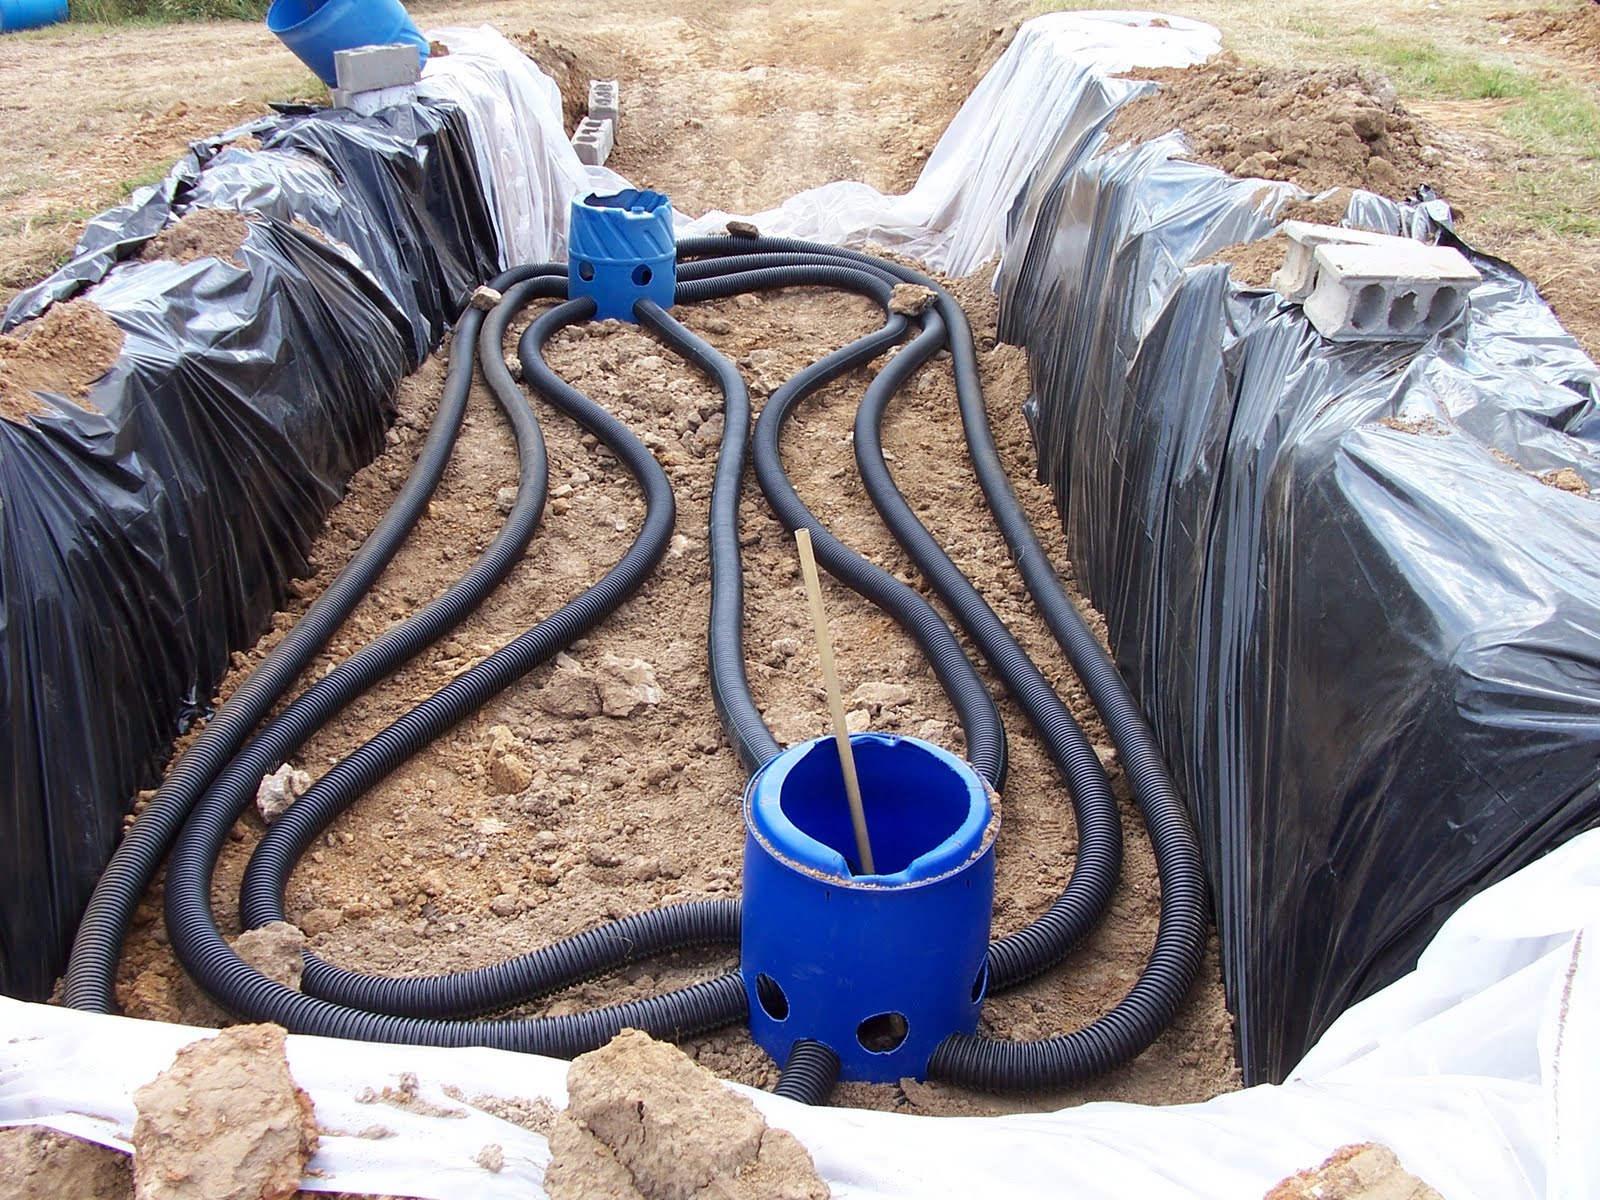
I attached another barrel with the top cut out, to the inlet and outlet plenums of the underground heat storage tubing using strips of scrap plastic, self tapping #12 x 1 inch screws, and foam pipe insulation for a gasket between the barrels. The barrels were attached upside down and I didn't cut holes in the bottom (now the top) so that as I back-filled the dirt, I wouldn't get dirt down in the plenum distribution area.

When the area is completely back filled, the ground level should be at or slightly higher than where the tops of the barrels come to now. The 650 feet of underground tile pipes will be four to seven feet below the surface! That is where the hot day-time air from the greenhouse will be circulated and the heat stored for later extraction or radiating to the surface.

I bought the remaining 20 cyclone fencing top-rails from Home Depot this afternoon, I already had 10, they were $9.41 each. The hoop house ribs will be made from three, 10 foot 6 inch, top rails bent in an arch that begins 5 foot from the end. This will make the width of the greenhouse about 16 feet wide and 11 feet high. I chose Home Depot over Menard's for the top rails because Home Depot had 17 gauge and Menard's rails were 18 gauge. The lighter rails from Menard's were $8.97 only $.41 cheaper, so I went with the heavier 17 gauge. The ribs should be no more than four feet apart so these 10 ribs are enough for a 36 foot long greenhouse. My total cost for for 30, 10'6" x 1 3/8 top rails, is $282.30.

Another item I bought today was the main circulation fan. I purchased a Master Flow Best Pro 3, Attic ventilator fan for $93.00 from Home Depot. It's rated at 1600 cubic feet per minute and came with an automatic thermostat adjustable from 60 to 120 degrees. Since I want it to kick on in the day-time when the temperature is 80 or above this should work great but I don't know how I can make it turn on at night when the temperature drops to 60 degrees or below? I think it will require a whole different set-up.

The fan housing measures 15 inches across. I thought I would use smaller 15-gallon barrels to house the fan and extend from the blue 55-gallon drums to near the ceiling of the green house but they are only 14 inches across, about an inch too small, but still may work.

Should the fan draw the air through the system or blow it through?

I think blowing it through would be best because it would seem more apt to force the hot air out the slotted drain tile pipe and into the ground. I'll have to go back and read some of the plans to see what they suggest. I think the fan would run quieter if it were mounted near the ground or even below the surface in the inlet blue barrel with just the intake barrels extending upwards toward the ceiling. I suppose it should also be located near the north wall barrel so the inlet barrels don't cast a shadow over the plants.

Tuesday, October 19, 2010

Components Arrive - part 2

A truck arrived this afternoon with things I ordered for my greenhouse. I was ecstatic, until I begin to realize that even though my order from FarmTek was amazingly swift, they sent my the wrong size plastic covering! I order a sheet of greenhouse film 32 x 100 feet but received a sheet that was only 24 x 100 feet! I paid $408.00 but received the $306.00 covering.

I was very depressed as I called and tried to straighten out the order. As it stands this evening, I'm being billed an additional $408.00 plus $89.54 for shipping to have the correct product sent! Eventually I'll have to send the incorrect package back. That will be a little awkward since it's a 7 1/2 foot long box that weighs 71 lbs!

After being on the phone for 30 minutes with Rosemary from FarmTek and while I was still getting over the disappointment of the wrong size plastic film, I opened a second box that contained the Outside Air Inflation System. It was missing one of it's component parts! The Outside Air Infl. Regulator Part #4PN0037! I couldn't bring myself to call Rosemary back! I figure she'll think I'm a crank or something, so even though I paid nearly a hundred fifty bucks and received an incomplete package, I feel like just letting it go! I just wish I knew what the piece is supposed to look like, and do. I think it's just a little filter that screws onto the outside air inlet. I should be able to cobble something together, but I can't find the kit pieces on the internet any place.

After writing here about my problem, I did go back to the FarmTek web site and filled out an incomplete/parts missing form. As much as I hate to complain, the kit they sent was incomplete and the price they've charged is higher than other inflation kits, so I'll see if they are able to make this right.


After the delivery truck left and I got off the phone with Rosemary, I received a call from a friend, she had obtained some plastic barrels for my project so I jumped in the car and drove to her place. I packed three, 55-gallon drums in my car and strapped three more on top! I did have to make a second trip because there were eight all together, but I thought I did good getting six on one load. Someday I really need to get a pick-up truck.

Making a Greenhouse - part 1


I began digging the foundation hole for my greenhouse around the end of September 2010. The finished hole is about 10 feet wide, 25 feet long with another 15 feet of sloped approach, and 6 feet deep. I used my Kubota tractor with front-end loader to excavate the area. Even though the ground is hard clay with rock, the digging was done in perhaps 8 hours and probably used less than 10 gallons of diesel fuel in my tractor. In addition to the front-end loader, I also used a three-point sub-soiler on the back of the Kubota to occasionally break up the ground before scooping it out.

The greenhouse will be located on a gently slopping, southern exposure, hillside, and is aligned north-south, oriented to the North Star. It's less than 100 feet from the house so that it will be close for water, electricity, walking through the snow in winter, and receiving a remote temperature signal.

The hole is a heat storage area and is lined with plastic and 1 1/2 inch polystyrene. Two 55-gallon plastic barrels were placed at either end of the underground heat storage area and layers of runs of four-inch slotted drain drain tile were laid out connecting the two barrels and then covered with back-fill from the clay soil that was dug.
There was a total of 27 runs of drain tile between the two barrels in four layers to five layers, about 650 total feet of drain tile is buried between the two barrels. All of the tile will eventually be buried four to six feet beneath the floor. I'll go into more detail as I document the construction, but for now just understand that warm greenhouse air will be circulated underground during the day and the heat retrieved at night. The process is called Subterranean Heating and Cooling and incorporates phase change of water to enhance the storing of energy.

I'm not sure I understand the process or the science behind this greenhouse model but I have faith that it will work in an awesome fashion when I'm finished! I'm going forward with this project with more blind faith than sure knowledge and I plan to document what I experience along the way. I hope it will be a successful adventure!

I'm waiting on a delivery truck to arrive this afternoon and then I have 10 more plastic barrels I need to pick up from some friends that are helping me along with this project. I have several stories to write of things that have already happened in this project, so I will try to catch up writing the history as well as the current happenings at Narrows Creek.